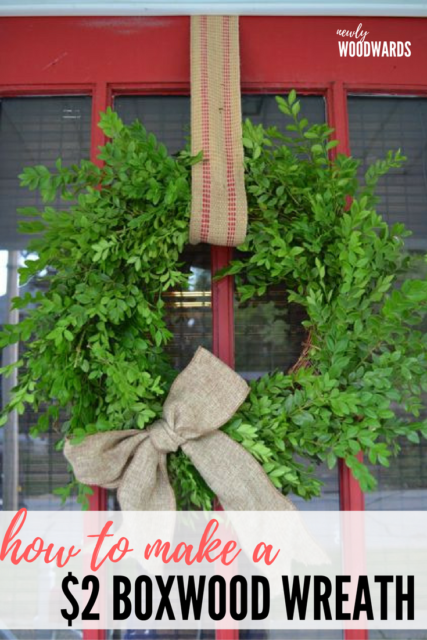
Make a DIY boxwood wreath for only a few dollars using a wreath form and scissors. You’ll love this quick and easy craft. So what are you waiting for? Grab a few friends and find an overgrown boxwood. (If you like this wreath, you’ll love my $3 hydrangea wreath.)
If you think that craft night exists solely to ensure I make things that I pin on Pinterest, you would be correct.
This month, we tackled boxwood wreaths. And it may be my favorite craft night project to date. That’s a lie, I love them all.
But I really love boxwood wreaths and have wanted one (or ten) in my house for ages. But the prices keep me away. I mean, $94.95? ON SALE? I love you, you pretty little thing, but I don’t bathe in gold coins.
So, when I spotted this tutorial to make a wreath from Liz Marie Blog, I immediately shared it with our craft night group. And I shamelessly asked if anyone had a boxwood shrub we could brutalize.
Luckily, Nici did. And lucky for us, Nici invited us all over that same week to get our wreath on.
This boxwood wreath is so stinkin’ easy that I plan to make fifteen more for Christmas decorating. (I dream big, people.)
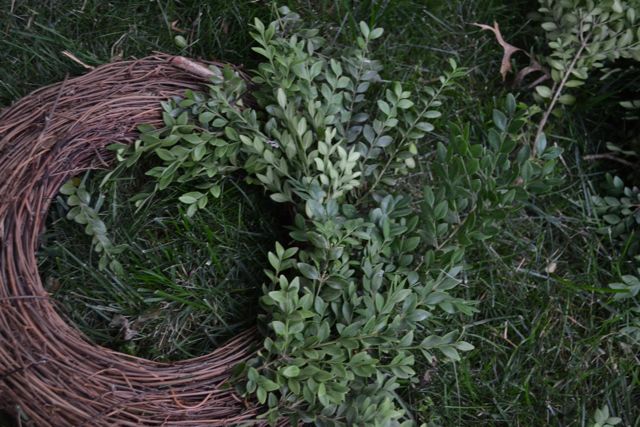
It all starts with a simple grapevine wreath. (This is an affiliate link. For more information, see my disclosures here.)
I didn’t want to spend $20 on one at the craft store, so I ended up picking up this stunner at Goodwill on half-price day. I consider it an act of charity to beautify this little wreath. I ended up paying just shy of $2 for her.
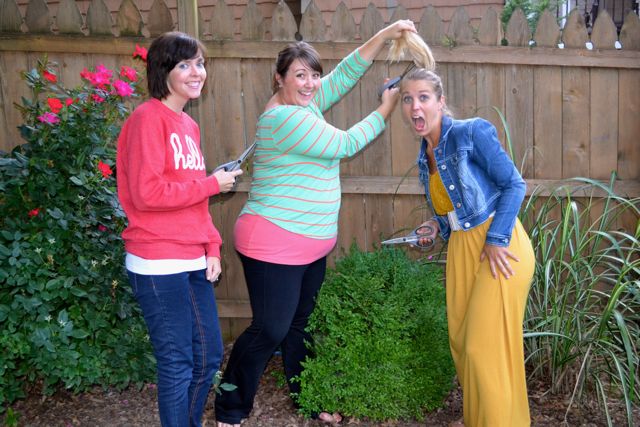
After cutting off the ugly, I was left with a normal grapevine wreath. Then, it was time to cut branches from the boxwood shrub. Nici immediately busted her scissors. I can’t make this up. The shame.
Luckily, we had backups. Disclosure: No ponytails were harmed in the making of this boxwood wreath.
Moving on. To make the wreath, just begin sticking the boxwood leaves into your grapevine wreath, working your way around and filling the front. The tutorial called for hot glue, but we didn’t need it. Which is awesome because it will make it really easy to refresh or change it up, if needed.
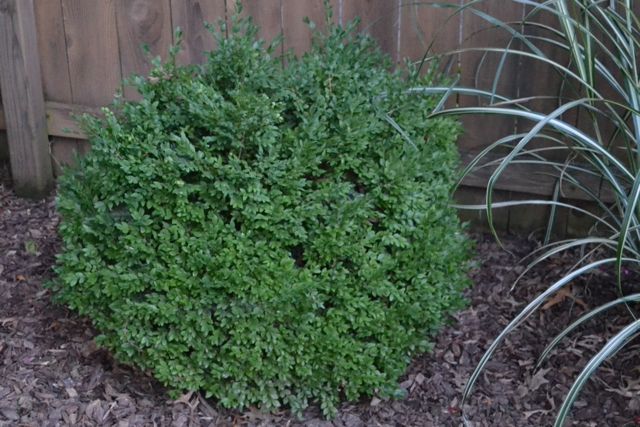
In case you are wondering, this is what Nici’s boxwood looked like. It really wanted a haircut anyhow. I considered this project a public service.
After working our way around the wreaths, we cut off the long branches and filled in the holes with smaller clippings. Then, we added a simple burlap bow (I bought the burlap wired ribbon from Save-On-Crafts. It’s really awesome stuff.) I also made bows for everyone else, because I’m awesome like that.

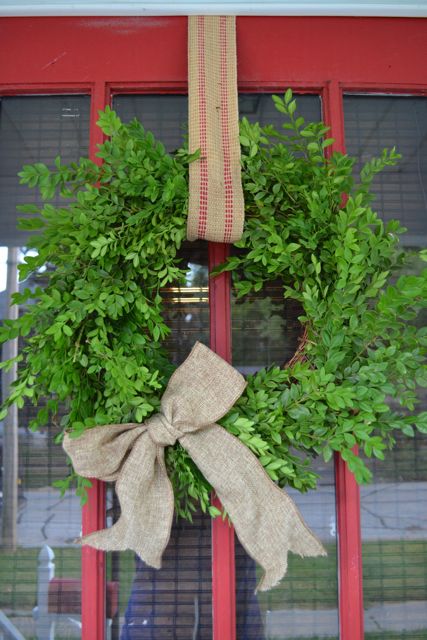
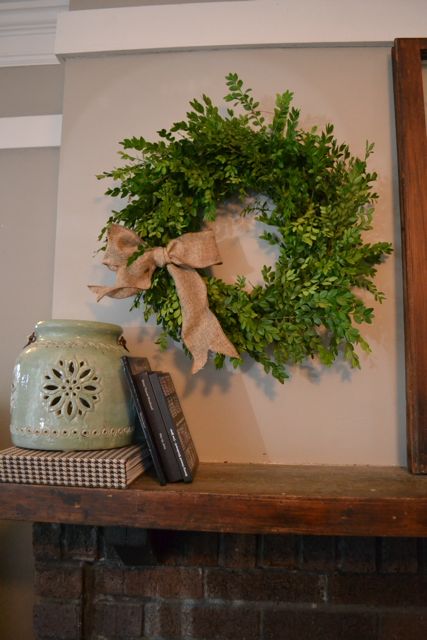
And here’s the final product on my door.

2017 Update: Because I didn’t do anything to preserve the boxwood, it only lasted a few months before it got dry and brittle. The good news – it only took a few minutes to recreate it when it was getting dried and yellow.
I decided to bring it inside in the end. I wanted to enjoy it, since we rarely use the front door.
That’s the scoop on my $2 boxwood wreath DIY project
Long live the DIY boxwood wreath! Go forth and craft!
Other craft night projects – Valentine’s Day wreaths, DIY necklaces, Doily clay tray and canvas artwork.
Other DIY wreath projects – $3 hydrangea wreath.
How do you preserve it? I would love to do this and it last a LONG time!
I’ve heard you can spritz it, but I haven’t tried it. It’s so easy to make, I just toss it when it gets crunchy and try again.
I love this!! Thank you for sharing.
I love the country look of a boxwood wreath, but you’re right, they are ridiculously expensive!!! Do you know where I could buy preserved or living boxwood? I know there are also many varieties…did you use just plain boxwood? They all turned out awesome btw!
I’m honestly not sure on the type of boxwood – my gut is that any would work. I haven’t specifically looked for someone selling boxwood – typically buying it isn’t going to be very economical. But you could potentially buy a preserved boxwood garland for a starter and get a few wreaths out of it. I have found that almost everyone knows SOMEONE with an overgrowing boxwood plant in her yard. It’s a win-win – get your wreath and help them prune their bushes.
Love this post and the photos set it apart from other “how to” pages. I agree, boxwood wreaths are gorgeous but so expensive! I’ll be pruning my boxwood bushes to make my own wreath. Thanks so much!
Good luck! I hope you’ll let me know how they turn out! I’m hoping to re-do my wreaths. They are looking a little frazzled after the entire winter. But, I figure it’s as easy as re-pruning.
How did you attach the hanging ribbon to your door frame in lieu of a wreath hanger???
I actually just attach it inside the door with tape or a tack. (I had a wooden door.)
Since I don’t live in the south, I believe it’s about pruning season up here. How long should I make the clippings? (I also find it a shame you didn’t post the “after” pic of the generous boxwood!)
I’m in the “north,” too. And I sort of prune whenever I want. 😉 I totally should have posted an after, but it was dark.
I probably cut branches around 6 inches long. But it was trial and error to get the right size to stick in the wreath form.
Good luck!
How did you attach the boxwood to the wreath?
The branches are just stuck into a grapevine wreath form. They’ve stayed in-place for months with no issues.
Just made my boxwood wreath from our own garden cuttings. My husband says it’s better than anything we could have bought!
So happy you had good luck with this! It’s so simple!
Very nice. I love them too. There is a way to preserve those branches so they will last. If you don’t preserve them they will eventually dry out, like you said, and turn yellow. Google -how to preserve boxwood.
Thanks for the info! I’m actually just going to make a new one when it gets too crunchy! =)
Now I just need a boxwood…. Lovely idea!
Hello Molly..me too..when she said how to make a box-wood for under $2 wow i was so jazzed….nope, i cant go cut off my boxwood bush either..did you find an alternative?…I looooooooooove those wreaths so much and i make my own wreaths ( DIY…save,save,save right)..i have 1000 something pins and i have made maybe 20 of them due to cost..anyhoo- let a gal know..thanks
Margie – reach out to friends. I think there are tons of people with overgrowing boxwoods in their backyards. (At least in our area, they are EVERYWHERE.) You can make your wreath and prune their bushes. Win-win.
Another option is to buy a faux boxwood plant – I’ve seen them at IKEA and other places. But this would be pretty pricy. (But would also last forever!) I’m thinking about trying this to make some smaller wreaths.
Pinning….love it! Christine from Little BRags
Adorable. Now I want a boxwood plant in my yard so I can cut it up.
I love it on the side of the fireplace!
We have boxwoods in the front yard (they look terrible and aren’t growing well). Perfect excuse for me to hack them up! Yay!
No way! I’m definitely getting a grapevine wreath! My boxwoods are overdue for a haircut…
Love them! I have five large boxwoods that are in desperate need of a good haircut. I might have to bump that up on my to-do list. Thanks for sharing.
Love it! Now if only we had a boxwood plant nearby…
Fun!!! I totally want to make one now!! And I so want to come to your craft night… sigh…. 😉
love it. i also love that you were the official bow maker. glad you werent the pony-tail chopper though!
holy moly! i’ve got to find a boxwood tree to try this!!!
SUPER cute. Love them a lot! And you girls are so silly!
Yay for craft night! And super easy crafts that don’t make any of us cry.
The boxwoods in my front yard are no longer safe. Very cute!
We have tons of boxwoods in our backyard. So going to do this for Christmas wreaths for our kitchen 🙂 Thanks Kim! xo Kristin