This is our final month working with Behr as a Behr DIY expert. To say that this was a wonderful experience was an understatement. We’ve been so lucky to get to complete a variety of projects big and small since September.
In February, we were asked to turn our sights to the bedroom – where the magic happens (ala MTV Cribs). It’s the perfect space to spruce up for the month of love.
In the interest of disclosure, I originally planned to do something completely different. I didn’t want to work on the bedroom because we will be moving soon and it seemed silly to put work into a room we wouldn’t be using for long. But when I received the paint I ordered for another project at the barn, I realized that the color would actually be perfect for the night stands in the master bedroom.
So, a project was born. Spoiler:
Most recently, the nightstands were white (as evidenced in my most recent post about the master bedroom) I painted them a few years ago after they were green for a few years. Recently, they were starting to show some wear and tear on the top. They needed refreshed.

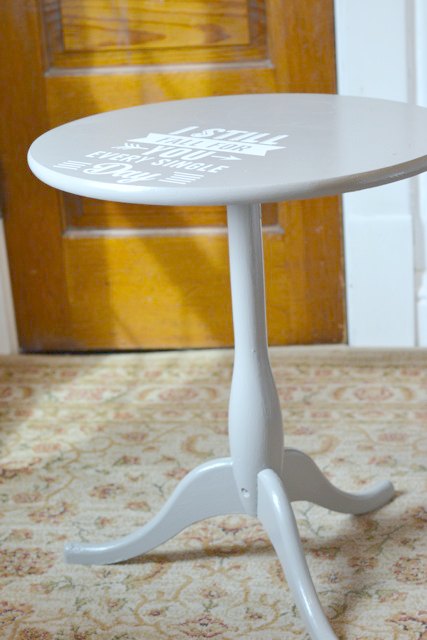
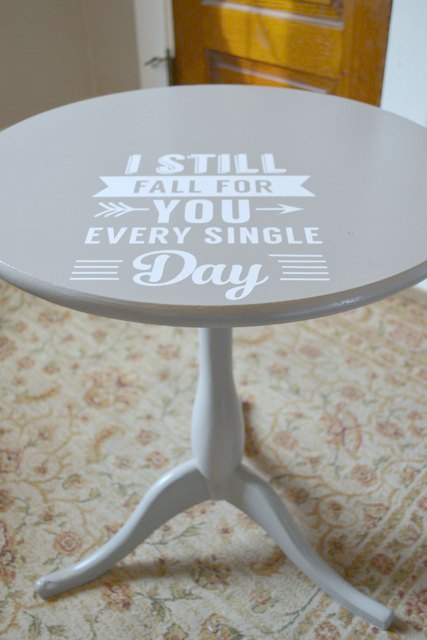
So, I decided that grey would be the perfect refresh. Something less stark than the white. During nap times I put a few coats of elephant skin in Behr Ultra Premium Plus Ultra. (I used semi-gloss, which I love for the sheen on furniture. This is also the color we plan to paint cabinetry at the barn, which is why I chose semi-gloss when I ordered it.)
After finishing the painting, I knew it needed something. I loved the color, but it was closer to the wall color than I expected. I wanted the end tables to stand out. So, while I let the tables dry for a bit, I cut a few designs in white vinyl on my Silhouette.
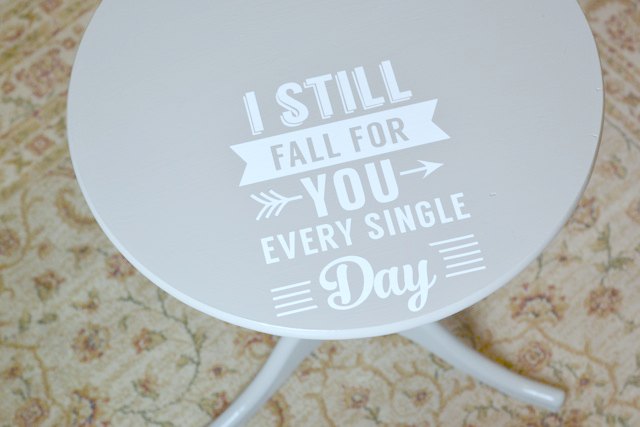
I purchased two coordinating designs for the night stands: This is our happy place and I still fall for you every single day. I almost never design my own Silhouette images because it’s only .99 to choose something better than I’d come up with. Both of these designs were really graphic and also cheeky, fun messages. I feel like you can be cheesy and romantic when decorating the bedroom, right?
Here’s the finished design on Ryan’s side of the bed.
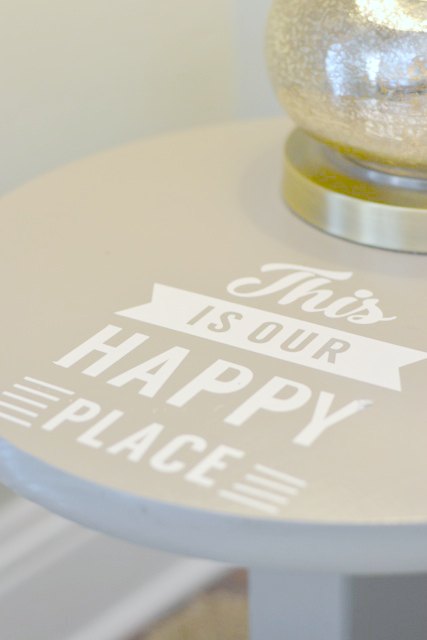
And on my side of the bed:
And a couple more photos of the finished product. (The end tables are a little different because Ryan actually made the second nightstand for me, but you get the idea.)
This project may be one of my favorites in recent memory. Is there anything paint cannot do?
This ended up being super quick from start to finish and I love the text on the top. It feels unique to me. And since this started as a cheap-o IKEA table, I feel like it’s been taken up a few hundred notches. And if I get bored with the message, I can just pull off the vinyl and start fresh.
I ended up making a few other updates to the bedroom after I finished the end tables. It seems that one change leads to a whole room change! It’s been fun to make quick and cheap changes and I love how the bedroom is looking. I’ll be back later this week with more.
Thanks again to Behr for choosing us to be one of their Behr DIY Experts. We have painted nearly every room in our houses and rentals with this paint, so when they approached us to work with them, it was a no brainer. It’s also been an honor to be among such wonderful DIYers (check out the other painting projects from Marty’s Musings, The Frugal Homemaker and Liz Marie Galvan).
And in case you missed any of the projects, here are the past six months of Behr DIY Expert projects.
What do you think of our graphic tables?
Thank you to Behr for providing paint to use for this project. All ideas and opinions, as always, are our own.
These are great! I love your creative mind! The graphic is perfect.
Thanks! It’s a good thing I didn’t have to design anything myself – it wouldn’t have been as cool. 😉
The words just totally make the piece – though I liked them blank, too! So excited to see your cabinets painted gray in the barn! Eeeeeek.
I love it Kim!!
I like it. A lot.
I love that shade of gray! And the messages are so cute 🙂 I love all your projects!
Sigh. I can’t wait until I’m a grown up blogger and get to do fun things like be a Behr DIY expert. 😉
look at your fancy slide show! Love the tables…definitely makes the plain ikea into something special 🙂
I love that graphic!! It’s gorgeous! Also that color is perfect for the a cheeky nightstand! 🙂
Oh my gosh! How adorable are those! That is seriously the cutest project ever!
i adore this! such a fun project, kim! pinning fo sho!
Thanks, Cassie!
This is such a wonderful project. I love that you used vinyl for it. How perfect is that. I love it!!
Thanks, Katja! I am excited I was able to do it with supplies I already had! The best kind of projects are ones I’ve been meaning to do.
These are adorable, Kim! I shared on Google+