I often (read: always) have big dreams for a crafty project when I begin. And I rarely (read: never) have a plan.
That’s exactly why this is not a tutorial-driven blog. Because usually, I have no plan and don’t actually know if something will turn out before I actually complete it. And I definitely do not have the time nor the patience to repeat the process. Thus, I rarely share step-by-step photos.
Also, I’m much lazier than anyone believes.
Let’s just pretend that it’s because I trust you all so much to be smart and creative enough to do any project on your own. You totally don’t need me!
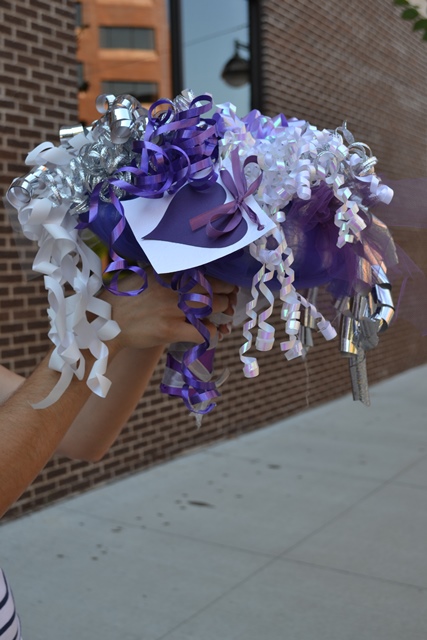
All of this to say that I wanted to share this rehearsal dinner bouquet I created for Emily for her wedding weekend from bows saved from her bridal showers. Mostly, because I spent too much time on it for it to fade into oblivion. Also, because I think it’s much better than others I’ve seen and created in the past. (Yes, I”m getting cocky.)
And the new Mrs. agrees. So, take that. (P.S. I should have taken a picture of Emily AT the rehearsal. Silly me.)

I really had big dreams for this bouquet and for the first time ever, Pinterest was no help. Everything I found on Pinterest was a bare plastic plate with bows smacked on the top. I wanted it to look more like a “real” bouquet.I wanted it to be fuller. I definintely didn’t want to see the plate. And I wanted the base to look like a wrapped floral bouquet.

We lucked out because all of the bows were purple, white or silver. I’d say it was luck, but it was really because Em coordinated her bridal colors with Bed Bath and Beyond. (Or did BB&B coordinate their colors with Em?)
Anyhoo, if you are looking to make a rehearsal dinner bouquet from bows and have big dreams, too, here are a few tips:
- Wrap the plate with coordinating tissue paper first.
- Then, add batting (like that from a pillow) between the plate and the tissue paper. This gives the top loft.
- Start with the large bows in the center. Then work your way outward, using the curly ribbons around the edges for spilling.
- Use hot glue liberally.
- Don’t hot glue your fingers together.
- Don’t ask me how I know.
- If you are ambitious, try making rosettes from long strands of ribbon. These make great fillers.
- For the base, you can use the standard ribbon holder. It’s really fine and no one really cares except me. But I wanted it to look like wrapped stems instead. So I used a cardboard roll (similar in size to a toilet paper roll, but thicker. Mine was from a roll of tulle) as the form. Then, I glued it to the base and wrapped it in some of the extra ribbon. It worked perfectly, looked substantial and stayed on well.
- To cover any glue residue or imperfections, use tulle. I love the tulle spools from fabric.com. I wrapped some around the bows and the base.
Voila! A fab bouquet for a fab bride.
Did you like this post?
We'd love to send you more inspiration and encouragement for your home. When you sign up below, we'll send you our free guide to save thousands on your next home project. Because your home shouldn't own you.
I’m throwing a bridal shower next month, so this will totally come in handy! Even though you didn’t give me photos and a step-by-step tutorial. I can probably forgive that.
That’s a great idea Kim!
For my shower, my MOH found what was basically a bouquet of sticks, but meant for faux arrangements. We taped the ribbons and blows to the sticks and it looked great! I tell everyone about these, but of course I cannot find them for the life of me anymore! I’m not making this up.. swears…
LB
Instead of a regular bouquet, for my wedding I carried a small family Bible with a tiny flower-and-herb arrangement tied to it with a ribbon . (See it here: http://bit.ly/17WMBLw). I definitely did NOT want to throw “the Book” at all the single ladies during the bouquet toss, so I used my bridal shower ribbons and bows as both my rehearsal bouquet and my “toss bouquet” to avoid injuring people (or, you know, wrath from heaven). This would also be a great way to protect your flowers if you’re considering drying or preserving them.
Great idea!!! Love the idea of using it again!
So cute! Look how creative you are 🙂