When Henry and I were making confetti Easter eggs, we also tried our hands at two other types of egg decorating that I’ll share this week. Today’s Easter egg project is something I’ve tried and loved before – silk-dying eggs with neckties.
I actually shared this concept a few years ago after being inspired by the silk tie dyed Easter eggs at Skip to my Lou, but I thought I could share the steps again for those who were curious about whether it is really easy. (It is.) I also thought Henry may like wrapping up the eggs.
Well. Womp womp. Henry could care less about tying silk around eggs and boiling them. So, I mostly made them on my own. But they still turned out pretty, so I’m sharing them. Forget the fact that my Toddler played with trains while I did this. Let’s just pretend we had a wonderful bonding moment over silk-dyed eggs.
Back to reality. Here’s how it all went down.
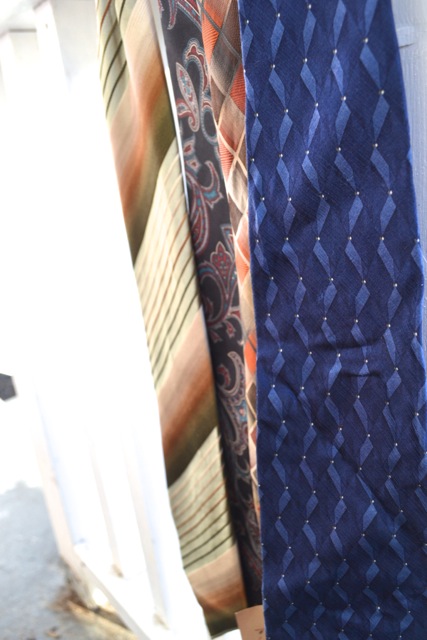
I went to the local Salvation Army and found four silk ties with potential. (I looked for those with a variety of colors.) I ponied up $6 for the lot.
Then, I cut up the ties and put the egg in the middle of the tie (with the outside of the silk touching the egg). The eggs don’t need to be pre-boiled.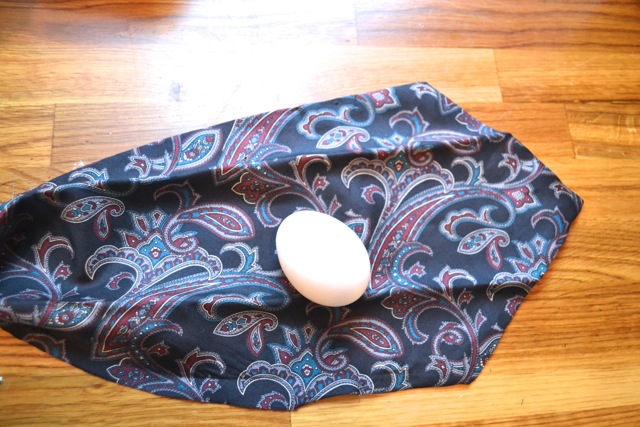
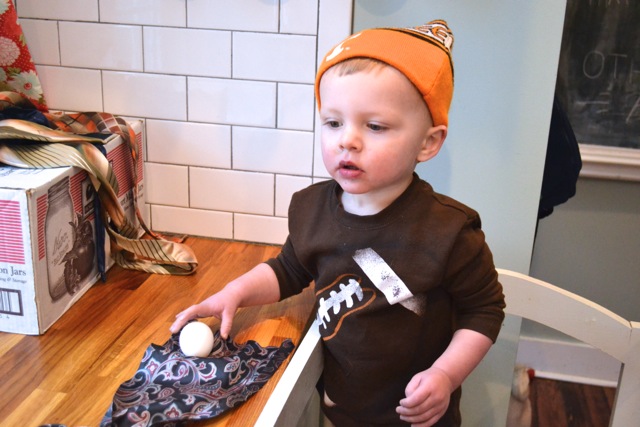
Henry got about this far before he bailed on me in lieu of choo choos. Lame. (In case you are wondering, he insisted on wearing that hat and I cropped out the fact that he was pantless. Hobo baby in the house.)
Here’s how I wrap up the egg, twisting the top. I’m afraid that a hand model I am not.
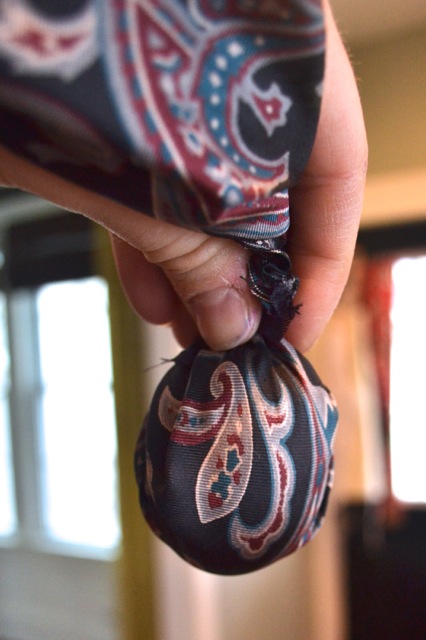
Then, I wrapped a small piece of white fabric around the silk (mine was a jersey with stretch, but I don’t think it matters). I tied the top tightly with twist ties and then twine (when I ran out of twist ties).
Next, I put the eggs in a stainless steel stock pot and filled it up with water on the dirty stovetop. Just make sure the water covers the eggs. Add a few tablespoons of white vinegar. Bring the water to a boil and simmer for 20-30 minutes.
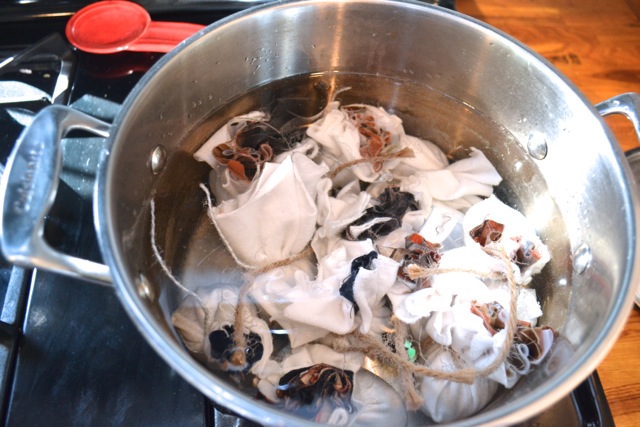
Remove from heat. I used tongs to remove the eggs from the pot to cool.
And even though you think there is no way this will work, you realize that it totally did! It really never loses it’s thrill!

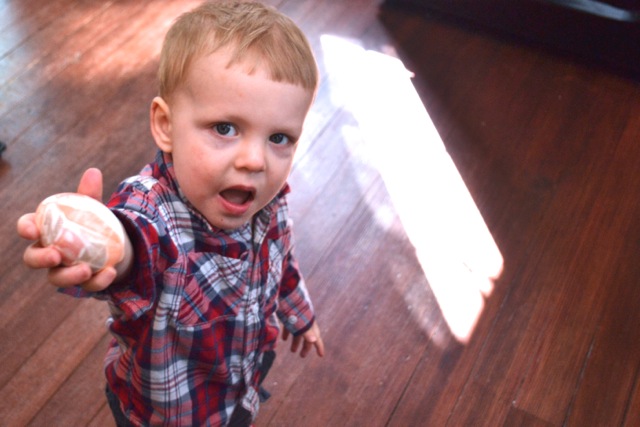
Even Henry decided to put down the train and hold these crazy eggs for a few seconds.
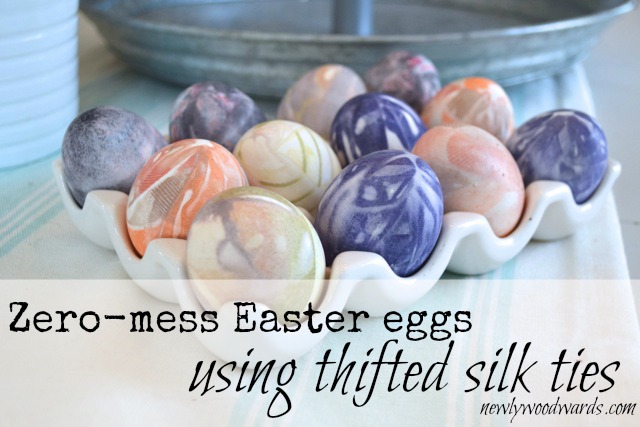
They are so beautiful in person.
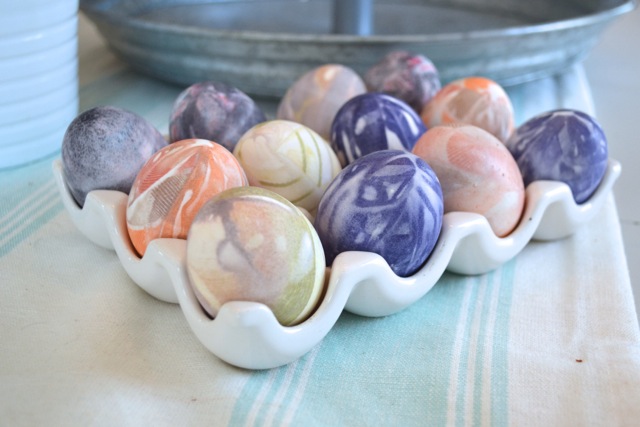
This is the way Easter eggs should look, friends. Like little pieces of artwork.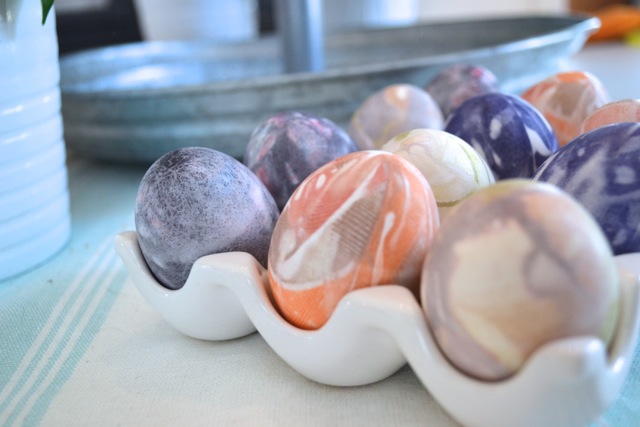
I took individual pictures of the eggs because I was so enamored with them. (“Get a life, Kim,” you are thinking. To which I reply, “These eggs ARE my life.”)
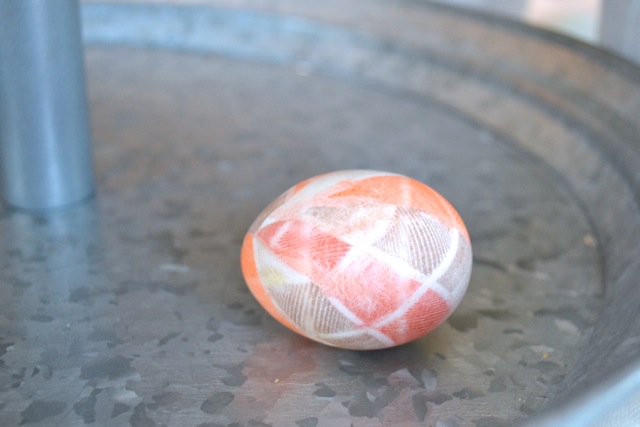
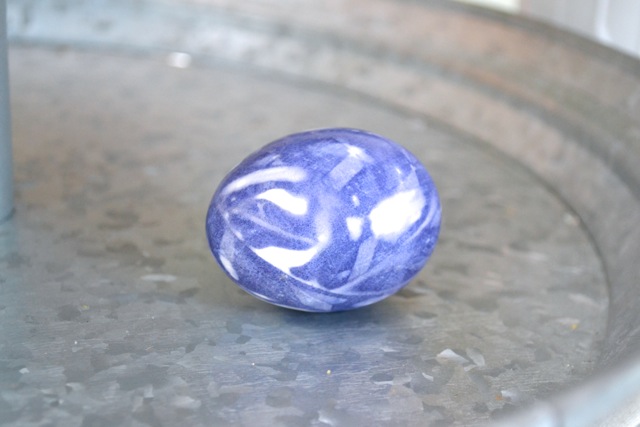


I don’t even think I can pick a favorite.
In conclusion, your toddler may be bored with these eggs. But they will make you so happy that it’s still worth making them. And they are so easy and leave behind zero mess. Neither of which can be said about my nearly-two-year-old. But I think I’ll keep him, too.

Did you match up the eggs with the ties at the top of the post? It’s a fun game, I promise!
Linking to Weekend Reading at Serenity Now.
Did you like this post?
We'd love to send you more inspiration and encouragement for your home. When you sign up below, we'll send you our free guide to save thousands on your next home project. Because your home shouldn't own you.
Hey! My friend and I just tried this at home and after 20 minutes the eggs barley had any print or color on them? Could we have done something wrong?
So bummed:(
So sorry this didn’t go as well for you. I’ve done it twice with great results, so here a few thoughts;
– Make sure your ties are 100 percent silk. And make sure your eggs are touching the “outside” silk part of the tie.
– Make sure to add vinegar to the boiling water.
– Make sure the silk and outside cloth are wrapped tightly against the egg.
Crossing my fingers you get it to work!
I also think that they could be nicely displayed on an “Easter Tree”. Take a dried tree twig of your desired size and spray with white paint. Cover a piece of florist foam with a bright Easter fabric and push and glue twig into foam.
Attach a ribbon to blown out egg, and hang eggs from tree.
This is a great idea, Lori! Wish I would have blown my eggs before decorating.
What a great idea!! Great upcycling project! I wonder if using an old cut up t-shirt would work for the outer cloth? This would keep up the the theme of an upcycled project.
This is a wonderful idea! We all have tons of old t-shirts lying around!
that is awesome!! and beautiful!
That is SO COOL. I’d do it without my hobo, erm, kid, too. Pinning for the next time I’m bored 😉
Moms of Hobos, unite.
I’m curious. I’d love to try this with my Grandkids too, but they like to still eat their eggs. Are the eggs still edible after this process?
This is a really good question. The official answer – I don’t know. The Kim answer – I ate the eggs. I’m still alive.
Sorry I can’t be more help. Good luck!
Love this idea.
Thinking old silk scarves might work too. Have you tried, or any thoughts about that?
I have used scarves – and I have used shirts, too. Anything that’s 100 percent silk will work beautifully.
Very clever – would luv to follow u by email
I’m going to try this with blown out eggs. That way I can keep them forever! It’s been a family tradition to decorate a few each year. My kids love seeing the ones from my childhood and the different methods we used. Thanks for the idea!
I love this idea so much! I actually wished I had done these with blown-out eggs after seeing how great they turned out. But I’ve never done that before – any tips for blowing out eggs? And how do you store them? I love the idea of making a few each year. So smart.
Shake them up first, it makes it easier. Use a thumb tack to make a hole in each end, a bigger one at the exit. Rinse them as best you can when they’re empty & let them dry. I store them in egg cartons. My kids 9 & 11 have been making them since they could finger paint. Now, they’re nearly masterpieces! They’re a wonderful keepsake and a “must” every Easter. It’s never too late to get started!
Thank you, Heidi. I think there’s still time to try this this year. And I appreciate the tips.
You sure got me inspired. How great are these eggs!!!! I have to run into the next Salvation Armee store to get these silky ties to make these! They are great and hopefully my little son of 4 will help me a bit…. but probably just like your Henry… soon seeing something more interesting to do….
Thanks so much for sharing this! I love them and I will also make a picture of every one of mine!!!!
Brigitte
Thanks for this really cool project my question is would it also work for anything besides eggs? I’m Jewish and I’m looking for some interesting spring art projects for kids that don’t have to do with Easter. Would the silk ties work to die anything else say other fabrics for example?
I’m truly not sure about this! It seems like the finish on the eggs makes it conducive to this, but maybe something else?
Or maybe you could still use eggs, but plant grass in them for a spring display. We did that one year and it was a fun springtime display – https://newlywoodwards.com/2009/04/happy-spring.html.
That is beautiful. But I have a question or two. Is it just the dye from the tie that stays on the egg? And can the tie be used more times than one? I would love to try that with the grandkids.
I guess my impression is that it’s the dye – but it only seems to work from silk for some reason. And the ties can definitely be used over and over. I actually dried my silk and kept it for the future. Good luck!
Woah! That is so cool! I can’t believe that worked! Is it weird I want to try this on my own, as an adult, with no kids?
Not weird. I’ve done it a few times BH (before Henry).
So fun! I did the neck tie eggs a couple of years ago…might have to try it again this year! I haven’t been very good about being in blog-touch lately. Hope you’re doing well! xoxo
I’m so happy to see your name pop up in my email. Miss you, friend. Love following along with your adventures on IG when I can.
Sooooo cool! I will be trying this out with my after school crafts club! Thanks for sharing Kim! Um by the way, Henry?! In that hat?! Tooooo cute!
Hobo baby.
Hope your club enjoyed this. You can also save and reuse the silk!
I am going to have to try these. They look amazing!
Incredible! So beautiful!! What a genius idea!
Wow, that is so pretty. I love how that came out and the patterns were such a great find too for 6 bucks. Love this!!
what a cool idea!! I’ve never seen this before! They look lovely and now all I can think about is how I’m gonna find some pretty ties for some eggs!
ZERO-MESS is the best kinda project! I will have to try this with the kiddos
that is actually pretty fascinating! thanks for sharing 🙂
WHAT? This is so cool! Who knew this could be done?!
Me. Clearly.
This looks so fun … I think my favorite is the paisley pattern!
Very pretty! I also dig Henry’s style.
He’s a total hipster.
So pretty! I sort of dread dyeing Easter eggs each year . . . always such a mess. (This is why Forrest doesn’t even know that pumpkins can/should be carved for Halloween–I can’t handle it.) Maybe we’ll try this method this year instead. And I like hobo Henry 🙂
um seriously! genius! so so cool!
BEAUTIFUL!! 🙂