Our yellow pine floors (from Lumber Liquidators) are officially finished and cured, and I am fairly certain I’m in love with them.
Installing and finishing hardwood floors ourselves is definitely not the easiest or quickest option when it comes to flooring. But I think they were worth the time and effort.
Not only is the flooring beautiful and warm in the space, but also authentic to the farmhouse look, and long-lasting
(If you missed the first two installments of our floors, check out why we chose unfinished wood flooring and how we installed the wide-plank yellow pine from Lumber Liquidators.)
I decided to try something different this time around and share a short video compilation of the process. I’m not a videographer (hence the fact that this is vertical video – doh!). But, I thought it would be fun to see the process in action – in less than a minute. Plus, Henry made a few cameos, and he’s adorable.
The flooring installation and finish process (for video haters):
- Install flooring. (This process is detailed in this post. Ryan used an air nailer to nail the boards in place. We chose yellow pine unfinished flooring from Lumber Liquidators.)
- Sand floors with an orbital sander (rented locally). The floors were new, so they didn’t need the same level of sanding as they would had they been previously finished. But sanding allows you to get a smoother surface and a better medium for taking the finish. Ryan went over the floors three times using 50, 80 and 120 grit sandpaper.
- Clean the floors well, removing all the dust from all the nooks and crannies. You want it as clean as possible before finishing.
- Prepare and apply finish. (Sharing more details about the tung oil finish we chose below, and how it was safe enough that even Henry could help apply it.)
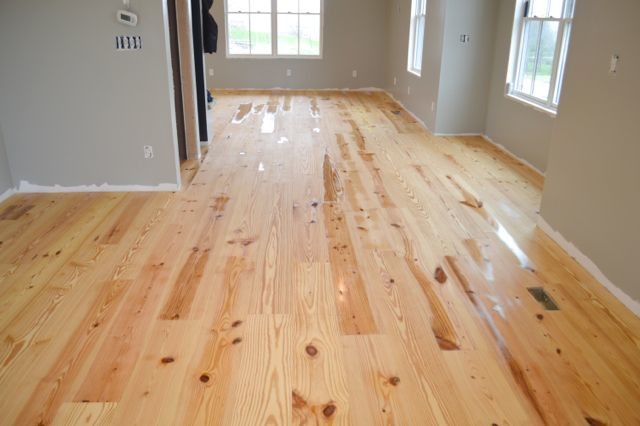
The last images in the video are after several coats of the oil finish, before the flooring soaked up the finish completely.
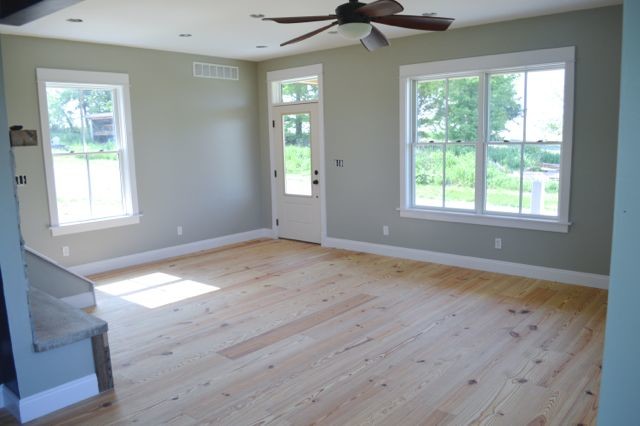
And this is the flooring today, after almost 6 weeks. (Yes. We installed the television. Priorities. Now I can paint while Henry watches Amazon Instant Video.)

Choosing a finish
For this house, we wanted something different than a poly finish (which we have used in two houses and a rental). The major problem we have with poly is that it doesn’t always wear well with time. It looks great at first, but we noticed wear patterns develop from traffic, dogs and kids. It happens pretty quickly. And if you want to fix those areas, you have to sand everything and start over.
No. Thank. You.
We started researching oil finishes because they allow you to touch up areas instead of re-finishing the entire floor, they can give you a great matte finish, they are nontoxic (all-natural and no VOCs), and they have been around for a long time. Oiling floors are not a very common choice to make today, but it was a great option for our home.
After lots of research, we finally settled on pure tung oil. The reviews were overwhelmingly positive, there were very detailed instructions available, and we thought it was something we could do ourselves.
The goal of an oil finish is to soak into the wood instead of living on top of the wood to protect it. This means that the oil protects the wood from the inside out. It won’t stop all the damage – like scratches or dents – but it protects it from moisture and provides a barrier. (And in our experience, nothing truly protects wood from damage that comes.)
The application process is rather simple – we followed the instructions from the website. (This is a Cliff’s Notes version, but if you are doing this yourself, I’d highly recommend reading and rereading the full instructions from the company.)
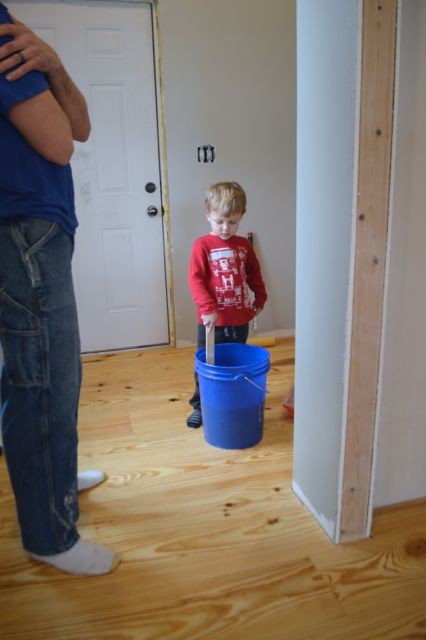
- Mix the oil (50/50) with citrus solvent. Ryan (and Henry) did this in a large bucket. The orange solvent smelled like oranges and the house smelled like oranges for weeks, but that was tons better than the chemical smell of most poly.
- Roll or brush the oil on the floors. (Rolling went smoothest for us.)
- Let the oil soak in for 45 minutes. If there’s any oil standing after 45 minutes, wipe it up with rags or clean t-shirts.
- Start the process again. (You can walk on the oil with clean socks.)
Ryan did this about 7 times total – 4 times the first day and 3 the second. Because the oil was soaked up by the wood pretty easily, he only had to wipe up excess standing oil each day.
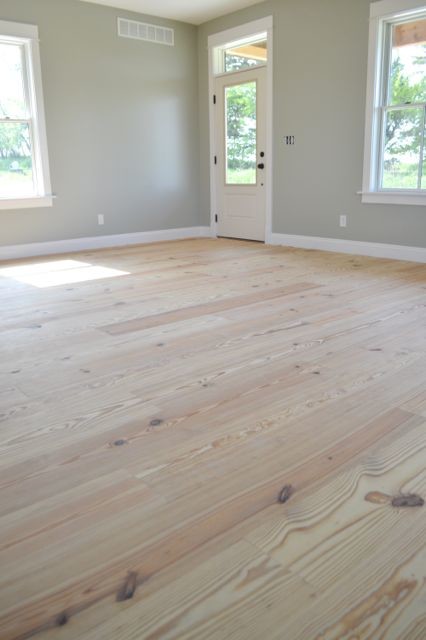
If you are curious about how the finish looks as it goes on, here’s a before (sanded) and after (one coat of tung oil) for a comparison.
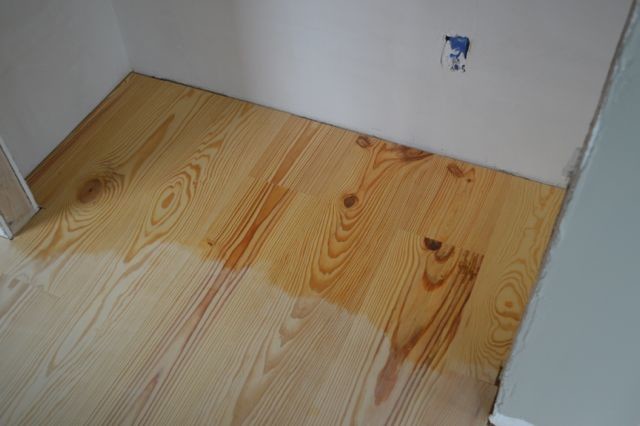
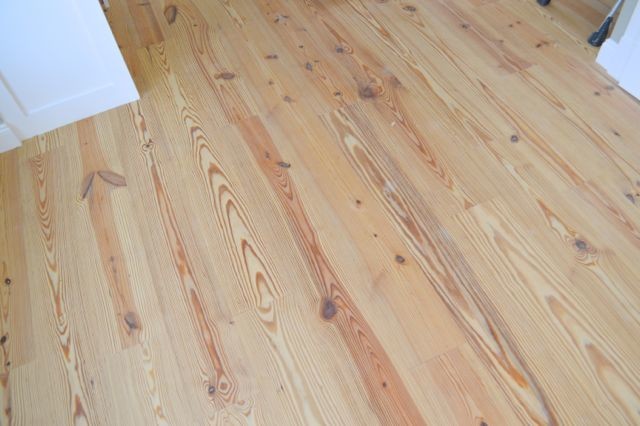
With yellow pine floors, the color of the floors doesn’t change very much. Once the oil cured, the floor felt a little warmer, but the color stayed close to the natural color of the original unfinished pine.
The one downer about oil finishes is the cure time – around 30 days to be fully cured. And it definitely took that long for us. But now, if we spill water, it beads up on top.
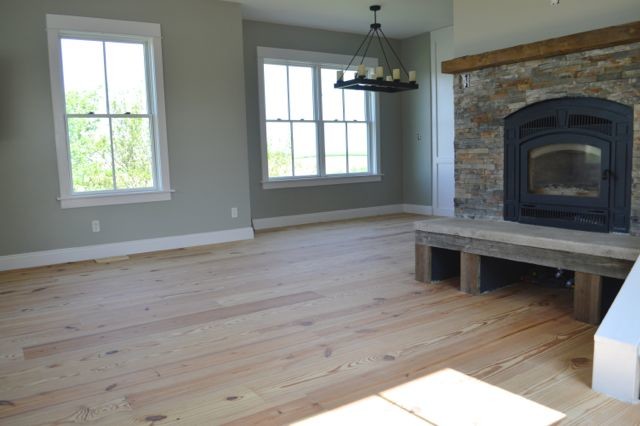
The natural tone of the flooring is a perfect mix of warmth with the wall colors and white trim (more on that soon). 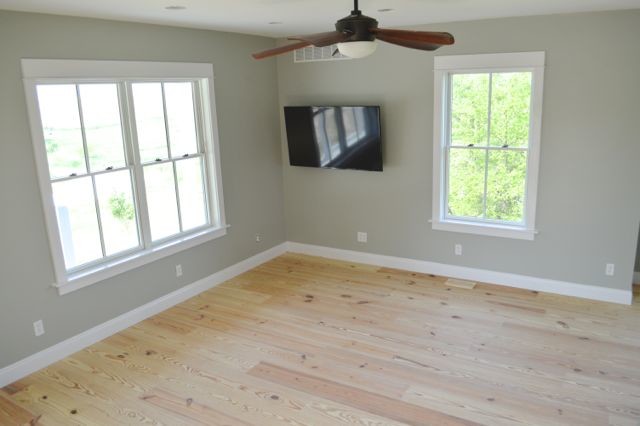
And I love that you can see all the various colors and knots in the wood – this wide plank yellow pine is really beautiful and has so much visual variety. The oil finish doesn’t hide any of the natural beauty. 
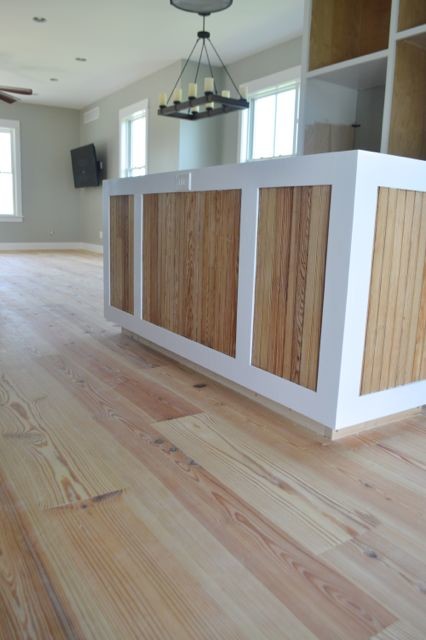
The tones of the floor also look beautiful in the kitchen. And the oil finish should hold up well to the traffic and moisture here, too. (If any areas do need a touch up, it’s just a matter of cleaning and adding more oil to the spot in question.)

The island and floors play so nicely together.
One small detail we added were built-in registers. My father-in-law took smaller scraps of the pine flooring and created these custom register covers that lie flat with the flooring. Ryan finished them with oil in the same way as the floors.

I’ll be sure to share more about how the oil finish wears over time, but we are so happy with them so far. I’ve cleaned them a few times (so much construction dust), and they easily get clean with a vacuum and barely-damp mop.
What do you think about our unorthodox flooring choice?
If you like this post, put a pin on it.
And if you love the oiled floor look, check out some other bloggers who have oiled floors we love – Content and Company, Wild Ink Press, and Baby Rabies.
Thanks to Lumber Liquidators for providing flooring for our main living space in our new home. Check out Lumber Liquidators on Facebook, Instagram and Twitter for more flooring inspiration. And thank you for supporting sponsors who make projects like this possible.
Did you like this post?
We'd love to send you more inspiration and encouragement for your home. When you sign up below, we'll send you our free guide to save thousands on your next home project. Because your home shouldn't own you.
Do you know how much tung oil you used?
Yikes, maybe I’m the odd man out here, but I don’t like this at all. It just looks like you have bare yellow pine laid down, which itself is not a welcoming or very attractive wood for flooring when unfinished. Like, it has that same feel that 1/2″ pine plywood subfloor panels have, like it’s waiting for something to go on top of it. The wood itself is quality, but just don’t like that look you went for.
It’s certainly not for everyone! But while you may not love it, it’s definitely a look that plenty of people swoon over – ourselves included. We get tons of compliments in person and online – and it’s definitely darkened over time. However, I can totally respect differing opinions. That’s the beautiful part of creating your home – you can choose what works best for you. Happy trails!
What do you clean you pine floor with? Do you walk with shoes on your floor? Mine seems to pick up shoe marks easily but maybe it needs to cure more…
We just use a damp mop pad to clean the floor (nothing super soaked). I have a Norwex mop and it works well. We don’t typically have shoes on in the house, but certainly do sometimes. We do notice some scuff marks from our feet and the dogs, but nothing major and it seems to come off with the mop. We do plan to re-oil soon, and that should help the scuffs, too. Hope this helps.
I have used both tung oil (undiluted) and linseed oil (undiluted) on Tasmanian oak floors (and antique furniture) and on spalted Tasmanian sassafras. Some people ‘thin’ or dilute it with turpentine (either pure or mineral) instead of the citrus oil. These thinners are supposed to enhance penetration of the oils into the wood and they give the impression that the oil is drying quicker. That may be true, but more coats are required. Tasmanian oak is a much denser and less absorbent timber than pine, but if the oil is rubbed in with either a sheepskin deck oil applicator, or just a piece of cloth, a beautiful result is still obtained. Once the oil is dry the finish is enhanced and made a little more durable by waxing. I didn’t want the sassafras to acquire any yellow tones from the oil so I added titanium di-oxide (obtainable from potters’ suppliers. It is used in glazing). This is what makes white paint white, and is contained in sunscreens and cosmetics. It’s lovely stuff. I never measure anything! To make ‘white oil’, just add it to your oil until the desired opacity is obtained. I add a small amount to achieve a finish which resembles limewash. To produce the ultimate finish, I’m about to limewash* a Tas. oak floor before finishing with the white oil then wax. *Hydrated lime and water. These finishes are foolproof but experiment with a few timber scraps first if you feel hesitant. As Kim says, they’re a pleasure to work with.
We are currently installing the same floors from lumber liquidators and using tung oil! We have one room done (3 weeks into drying at the momemt). 2000 sq ft more to go! However, we did not sand prior to applying the oil and I’m hoping that was not a mistake. The wood was raw so we did a good scrub with TSP and let it dry for a week or so (didn’t use a lot of water, it was a light scrub). The oil soaked right in and never had to really be wiped after seven coats. Do you think this is Ok?
Jamie – I’m not 100 percent sure, I only know the way we did it. I would probably check with the oil company you used. In our experience, you should be putting oil on the floor until it doesn’t soak in. (That’s telling you that it’s saturated.) If it didn’t have to be wiped off, you may need more coats. But that’s just my thoughts. Good luck!
Hi! We did almost the exact same thing to our floors. We have TG 3/4″ reclaimed heart pine floors. Our flooring guy did 3 coats of Waterlux Original finish (no dilute, no stain & a very low gloss finish). I love the look of our floors & I know real wood is going to scratch, but have u found anything to help prevent/ hide scratches??
& I just mop with Pinesol. I’ve thought about using OrangeGlow or Murphy’s (just occasionally) to see if that would give it some protection… but, I’m afraid of the build-up that those products leave.
Help!!! 🙂
ok, ignore my question above. I should just buy the gallon that is already half & half. Now how big of an area you had and how many gallons did you use for the 7 coats? I have 2,000 sq. ft.
Thanks !!
Hi, thank you for this post. I have been looking for a long time and finally found what I needed.
I am a little confused though, when I go to Amazon to purchase it do I get the two gallons, one of the tung oil and one of the half and half? and mix those two equal parts?
Or in your case you only used the tun oil, I want the look you did at your house.
Thanks !
It now appears to be a year from the date of this article. Soooo, did you put the floor in a bathroom? How is it holding up with the tung oil finish? (Thanks so much for your article.)
I’ve actually been meaning to update – but it hasn’t happened yet. The floors have been holding up really well! We plan to reoil the floors again sometime this summer, but they look great and the color has deepened a bit with age (which we love). The oil is still holding up to water (it beads up on contact). And we haven’t any major damage at all after being used and abused for a year. (Frankly, I assumed we would have more dings and scratches than we have.)
We didn’t install wood in the bathrooms – so I can’t speak to that. We used sheet vinyl, which we love.
Hi! How long did you wait before you had foot traffic & what not on your floors? I’ve never considered using tung oil on floors before, but the idea is growing on me!! We use it for our butchers block & it is FAR better than anything else we’ve used on them. anyway, we’re building next year & I’m interested to know how long before you can walk/ out furniture on it. Thanks!!
It is definitely at least a week to 10 days before you’ll want to move your furniture in – if not more. You can walk on it with socks almost immediately, which is really nice and shouldn’t be an issue with the finish. You can also put down wax paper on the floors to protect the finish. We tried this but it was super annoying and the paper just went everywhere.
The folks at Real Milk Paint (where we got the paint), recommend 7-10 days until you walk on the floors with shoes, so I would assume this would be the same for most furniture. We actually waited almost a month before bringing in our furniture, but will do a maintenance coat of oil this summer so we’ll be able to see how fast it is safe for furniture.
What Color of paint did you use?
On the walls? It’s Behr Marquee Pumice
Thank you! Yes, I mean the tung oil. We’ve read that should wait a day between coats, but other sites (like yours) put several coats on a day. We have also been warned that LL unfinished pine will gap, have you experienced any? Thank you!
I highly recommend following the instructions from Real Milk Paint Co.
As for gapping, we heard the same thing but haven’t noticed anything to this point. (About 6 months in).
Good luck!
We are putting new unfinished pine in our place, too. We read conflicting advice on how many coats to put on and how long to wait between coats. Do you have any advice? We have young sons and dogs, so I’d also love to know how difficult it is to keep these floors clean. Thank you!
Nell – are you talking about tung oil? We covered this in detail in the bottom section of this post. We followed the instructions from the company (which I believe are also linked above). It has a lot to do with how long it takes for the oil to fully penetrate – putting on a coat and then wiping off, doing it over and over until the oil no longer absorbed (meaning it’s ready to go). That ended up being 7 coats for us – 4 the first day and 3 the second.
We have also done poly in the past and done 2-3 coats, usually, in the past.
However, we have found the oil to be MUCH easier to put on ourselves (poly is a little touchier and much stinkier). And the oil has held up really well, while allowing us to add another coat in places of high traffic (unlike poly, which would require you to start over). We’ve only been in the house since June, but the floors are holding up well. (We were very unhappy with the wear of our wood floors and poly in past homes.) The pine is a soft wood, so there have been some scratches and dents. But you wouldn’t really know they are there unless I told you. The finish is matte and cleans easily with a mop and light water. In places that have more dirt, I just use mild dish detergent and water.
I’ll eventually write a post updating this, but for now, I can say we are very happy with our choices.
Hope this helps.
Love you floors!! We put pine in our old house and polyurethaned it… You’re right it doesn’t wear well. The poly peeled and chopped in spots, especially the edges of the wood. I’d like to do this in our new home, but when you say it takes 30 days to cure… Does that mean you can’t step on it until the 30 days are over?
Thanks for the floor loving shout out friend! This is such a helpful, inspiring post! Can you say, “new tung oil users guide!?!?” Yours came out gorgeous! We absolutely love our oil finished floors, and wouldn’t trade them for anything. Just a year later, the natural color variations are more pronounced and get prettier everyday (literally). Go team tung oil!!!
Thank you so much for all the help and guidance as we researched these floors. There wasn’t much out there in the way of info and I appreciate it so much.
Any tips on cleaning? Do you use any special products or dust mops? I’ve just been using a damp dust mop and it seems to work okay.
Love ’em! Way better than adding chemicals and off-gassing to your beautiful new home. What a great choice!
okay, so now I’m all distracted by the TV on the wall (floors are great), how are you planning your living room furniture layout and did you have any thoughts about mounting tv over the fireplace?
Kim you have done such a justice to your home, great choice. Thank you, thank you, thank you for installing real wood floors. I get so tired of seeing prefinished, partly laminate, click and snap crap all the time. 100 years from now the owners will still be loving on your floors. Our 300 year old wood floors are only oiled as well, no poly or stain, the beauty and natural wear are what makes wood floors amazing.
oh, I love how wide the planks are! And the matching register covers are just killing me–so awesome 🙂
The floors look really nice, I love natural oil finishes! I am completely heart-eyes for those custom registers, what a lovely little detail!!
i love tung oil and have used it on furniture before!
I am a big big fan of your floors. And not a fan of poly. At all. I love the matte finish you got with the oil and color is just beautiful. Oh and those recessed floor registers. Genius!
Thanks, Katja! The floor registers are definitely one of my favorite parts – and it makes cleaning even easier. (Lazy girl over here.)
Your floors look beautiful and yay for using a natural alternative! I’m a fan of tung oil and have been considering doing something like this for our counters… once we actually get to that project, ha. Now I’m definitely sold on it!
We actually have a butcher block island in the barn I’m going to try tung oil on, too. Waiting to move out before I try it.
I love pure tung oil and citrus solvents! I used it in my daughter’s room. Great choice, Kim!
LOVE the floors! You guys really are rock stars with all the research you do…
Beautiful!! Did you do the same wood upstairs or are you planning something different? I have loved seeing the progress of your house, it looks great!
Your floors are gorgeous!! Is it possible to stain the wood before doing an oil finish?
That’s a good question and I’m not 100 percent sure of teh answer. They do have a dark tung oil alternative that’s supposed to add a little color, and that may be an option. And I know other brands of tung oil also have colorants, but I don’t have any experience with them. The different types of wood also take tung oil differently – pine is the most natural, but I think oak takes it a little darker, which would be another option.
They look so amazing. I love the wide plank and natural pine color.
Nice work 🙂