Well… it’s finally time for the big reveal for our “new” dining room. Thanks for giving me feedback about wainscoting for our home. The process was quite a lot of work for hubby and I, but I think the results are really worth it. I’m going to post the photos of the finished product first, and then I’ll go into more detail below.
Cliff’s Notes Version:
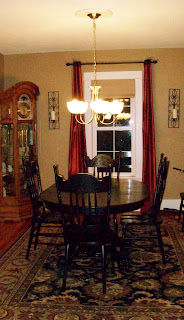
Before:

After:

And, now if you are interested or bored, the backstory…
At the beginning of September, I mentioned that I had wainscoting on the mind. You all recommended that we go with board and batten. (And, some of you were even kind enough to give me links to more information.)
Once I figured out what board and batten was, I knew I needed it in our dining room. It was life or death, people. Life.or.death.
Poor husband. He didn’t stand a chance.
Unfortunately, something I didn’t mention in the first post was that Ryan was adamantly AGAINST any type of wainscoting. (Bad wife. Bad, bad wife.) So, following the aforementioned blog post, when I decided that board and batten was a must, Ryan and I talked about it.
(When I say we talked about it, what I actually mean is that I begged and Ryan declined. And, then we both went back to our corners. After thinking about it, I actually decided that Ryan was right about wainscoting (but don’t tell him). It would be a lot of work. Our house is about the farthest thing from level that a home can get. And, our house really is lovely as is. He’s done a lot of work already. I was beginning to feel bad about begging for it.)
So, I didn’t bring it up for, I don’t know, an hour. Maybe two? 😉
But seriously, we both just kinda dropped it for a few weeks.
Then, on a Thursday night that will forever live in infamy, we were talking about the weekend. I asked what his plans were. He said…
“Well, I was thinking I could put up wainscoting for you in the dining room.”
SCREECH….. My heart stopped. Then, I screamed. Then, I thanked him. Then, I cried. Then, I had to go hang out with Google for an hour (or four) to find out what exactly we needed to get at the hardware store the next day.
Thus began our progress with wainscoting.
We thought it would be simple. Hehe… hoho…. haha. The truth is, everyone does it a little different. Everyone’s home is different. So, we used a few tutorials online and then kinda trusted our guts to finish it. It worked out pretty great in the end.
The process
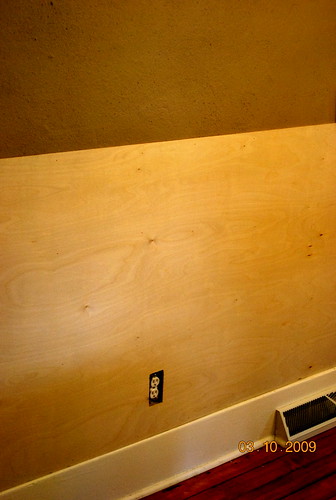
Our home has textured walls. I tell you up front this because it means that the faux-paneling methods that are gracing the Internet really wouldn’t work for us. Most tutorials that I found just put the boards right over the existing walls. We couldn’t do this with textured walls because if we just put the boards up over the wall, it would look silly. It wouldn’t look like board-and-batten. It would look like boards over textured walls.
So, we decided to use a base of plywood. It’s really just an extra step.
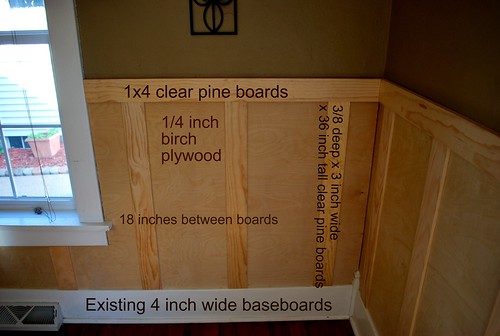
The supply list in the words of Kim:
- (base) 48 feet of 1/4 inch birch plywood
- (vertical boards) 35 – 3/8 inch deep clear pine boards, (36 inches tall, 3/8 inch thick, 3 inches wide)
- (top horizontal boards) 48 feet – 1×4 clear pine boards, (3/4 inch thick, 4 inches wide)
- lots of paintable white caulk
- nail gun with 2 inch and 1 1/2 inch nails
- semi-gloss trim paint
- foam roller
- touch-up paint
Here’s a diagram of the sizes of boards we used, for visual reference.
 The process:
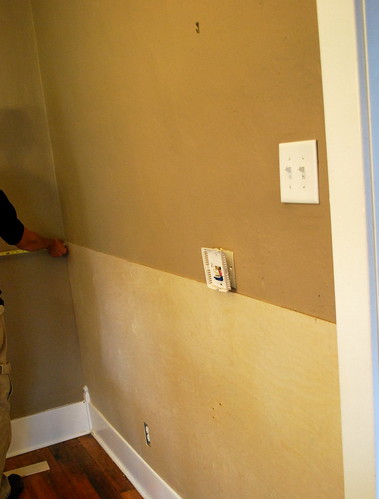
Begin with the plywood as a base. Ryan began from the corners and worked his way around the room.
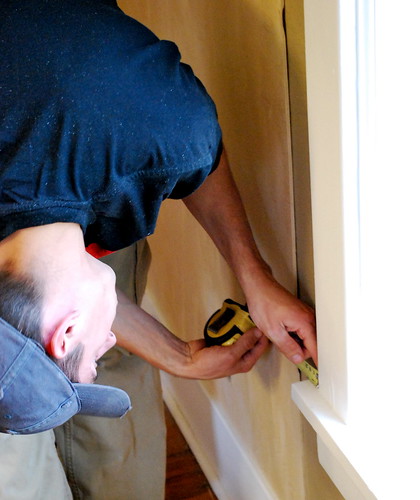
Ryan measured each area to cut around electrical outlets, windows and corner decorative moldings. This took a great deal of time, because our home is very old and very uneven.

Measure a lot. Measure more. Measure one last time.
When the boards were cut (they are 36 inches high), he nailed them to the wall with a nail gun. I thought we should use some sort of glue, but I was wrong. The nails hold up plenty well.
 The corners do not have to be perfect (even if your wife is worried that they should be). Any gaps can very easily be concealed with caulk.
The corners do not have to be perfect (even if your wife is worried that they should be). Any gaps can very easily be concealed with caulk.
You’ll also notice that the boards ended up being a little different in height. It’s the bane of poor Ryan’s existence. Our house is that far from being level. In some places, it was a difference of an inch. He concealed the difference later with the top board.
Here’s what it was looking like after a few boards were up.
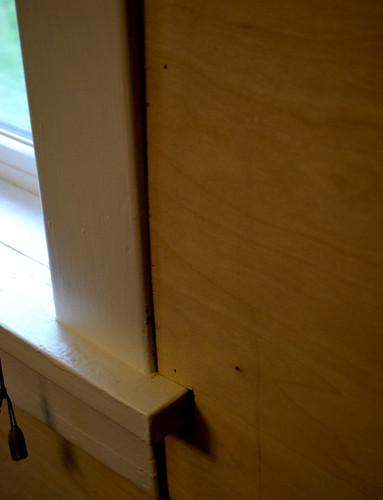
 Notice the pretty little corner decorative pieces. How did he cut around these?
 He made a template.
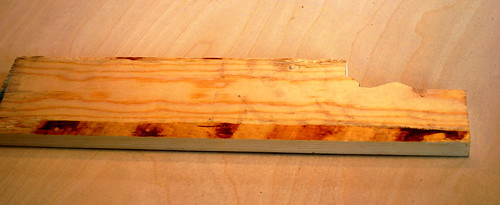
Notice the pretty little corner decorative pieces. How did he cut around these?He made a template.
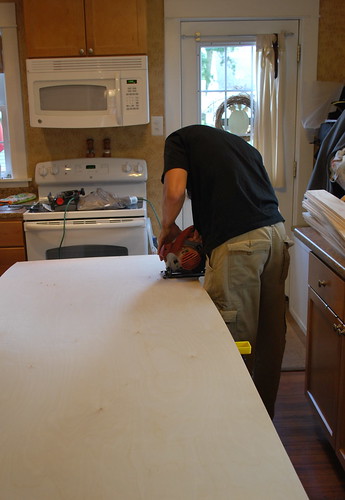
I suggested Ryan cut the boards inside. It was nasty outside and I didn’t want the boards to get wet. Very bad idea. Very very bad idea. I don’t know what got into me. Luckily, the rain cleared up and the saw went back outside.
Keep measuring…. you are doing good.
 Next, Ryan put the horizontal boards on the walls. We wanted it level, regardless of whether the floor is level (which it isn’t). I didn’t get any pictures of this process.
But, essentially – we did a little math to figure out that the biggest discrepancy was about an inch at the top. So, we cut a chunk out of the back of the board so that it would slide up to an inch down, over the 1/4 inch plywood. It looked similar to the way hardwood floors snap together. Then, we just used a level to put up the boards around the room. They are all level. YAY!
Following the horizontal board, Ryan cut the vertical boards and installed them 18 inches apart from each other.
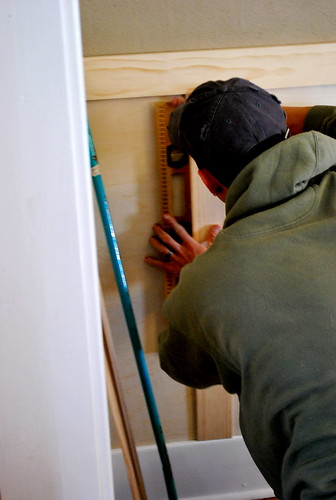 Note: Everyone seems to do this a little differently (see links below). We decided that we wanted the boards equally spaced on all walls. Some people center each wall and make the boards differing distances. Some start on the edges.
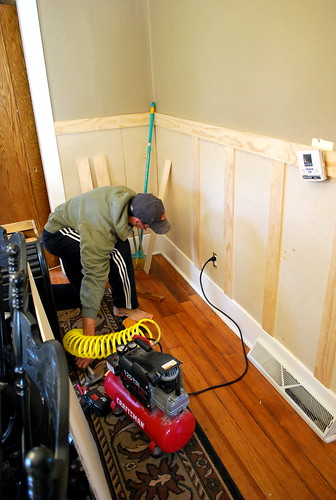 I don’t really think it makes a big difference. Just personal preference. I like the way ours turned out, and I know that they are all equally-spaced. That’s good for a type-A person like me.
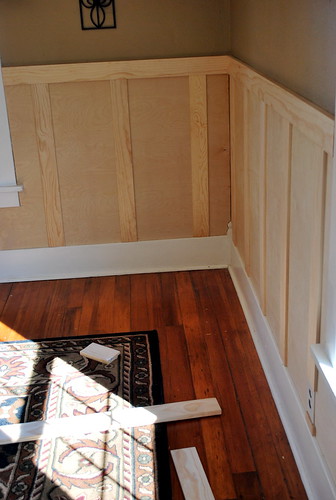
This entire process took about one day. Then, Ryan caulked all the gaps, the nail holes and in between boards.
Next, I painted the wainscoting.
It took one coat of oil-based primer and three coats of white, semi-gloss paint. At that point the coverage was good.
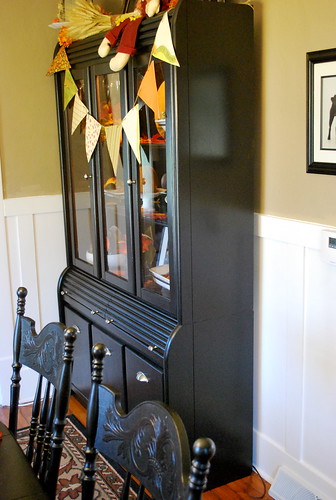
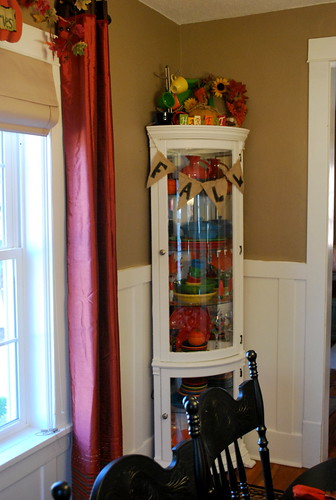
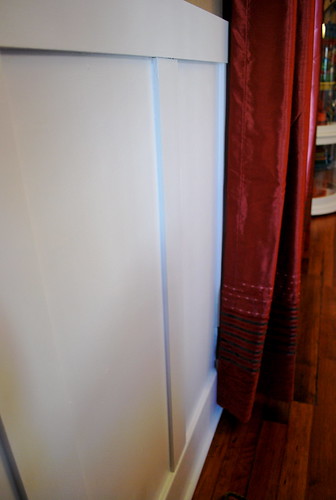
Here are some close-ups. Even though the baseboards are almost 100 years older than the rest, I think it blends pretty well. (I touched up the baseboards, too. It’s scary how much they needed it.)

Then, we just put our room back together. And cleaned. A lot.
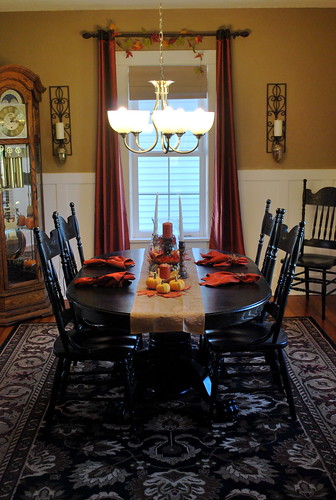
I think that it really brightens it up and adds to the character of the home. I’d like to believe that this is something that original owners would have done. (Although they probably didn’t have a nail gun. I don’t think.)


Ryan and I like to tell each other that we feel like millionaires now. The woodwork is that good.
So… if you’ve made it this long… I’m shocked. And impressed. But, mostly shocked. If we really were millionaires, we’d send you a million dollars. But we aren’t. Sorry, friends. Maybe someday.
Hope the tutorial was helpful and interesting for you. And, I hope you like what we’ve done. Ryan and I are surely happy with the result.
(Actually, I’m the happy one. Ryan told me that he likes it. But, really he’s just happy that I’m happy. He kinda rules.)
Appendix:
In case you are also interested in Board and Batten, here are a few links that I came across while planning. I hope they are helpful.
A Soft Place to Land (this woman can do everything)
Funky Junk Interiors (I want a backsplash like this)
There are probably millions more…. hang out with my bff, Google. He’ll help a brotha’ (or sista’) out.
Did you like this post?
We'd love to send you more inspiration and encouragement for your home. When you sign up below, we'll send you our free guide to save thousands on your next home project. Because your home shouldn't own you.
What a great tutorial. Your description of how you and your husband came to an agreement about this project is 100% the way my husband and I operate on house projects (me the dreamer, him the realist with the skills).
Dreamers, unite!
I’m about to embark on the wainscoting journey and have a probably stupid question: did you consider painting the boards before hanging them and then just touching up? Or is there a reason I shouldn’t do that? Thanks!
It’s probably fine either way. I like to paint them while they are up on the wall so I can do a better job of getting into cracks and crevices. We also typically caulk gaps and such, so that will need paint. But if you paint before, there may be a need for less coats. Good luck!
Your tutorial ended my search for someone who had done board and batten in a home with the same thick trim that our new house has! All of the other ones I’d seen were so thin that they would look funny with our baseboards and trim, and I wasn’t sure if this style would even work in our house. Thanks!
Good luck! I’m sure it will be awesome!
I blog quite often and I truly appreciate your information.
This great article has truly peaked my interest.
I am going to take a note of your site and keep checking for new
details about once per week. I opted in for your RSS feed too.
Valuable info. Fortunate me I discovered your web site by accident, and I
am surprised why this accident did not took place earlier!
I bookmarked it.
This design is steller! You obviously know how to keep a reader amused.
Between your wit and your videos, I was almost moved to
start my own blog (well, almost…HaHa!) Wonderful job.
I really loved what you had to say, and more than that, how you presented it.
Too cool!
Do you have plaster walls?
Yep!
I am trying to recreate your look and I can’t find 3/8″ x 3″ boards, where did you find that size?
Robin – we got the 3/8 boards at Lowes. We cut them at 3 feet. Hope this helps.
This comment has been removed by a blog administrator.
This comment has been removed by a blog administrator.
This comment has been removed by a blog administrator.
This comment has been removed by a blog administrator.
Great work! Thanks for posting the link. I completely agree – it adds SO MUCH to the room! Absolutely beautiful.
This comment has been removed by a blog administrator.
This comment has been removed by a blog administrator.
This comment has been removed by a blog administrator.
This comment has been removed by a blog administrator.
This comment has been removed by a blog administrator.
This comment has been removed by a blog administrator.
calainark [url=http://www.ibanezwiki.com/display/~here-you-can-buy-prednisone-online]interaction prednisone[/url] Prednisone [url=http://wiki.sla.org/display/~where-can-i-buy-prozac-online-without-no-prescription]prozac side effects[/url] Prozac [url=http://www.ibanezwiki.com/display/~here-you-can-buy-vicodin-es-online]vicodin[/url] Vicodin ES [url=http://docs.safehaus.org/display/~buy-lasix-without-prescription-online]side effects to lasix[/url] Lasix [url=http://docs.safehaus.org/display/~buy-bactrim-without-prescription-online]bactrim[/url] Bactrim AdandHaut
This comment has been removed by a blog administrator.
This comment has been removed by a blog administrator.
This comment has been removed by a blog administrator.
This comment has been removed by a blog administrator.
Kim!!! It looks amazing!!! Really opens/brightens up the room, but keeps a cozy feel. I’m so impressed!
I got a good laugh out of reading this! You have a very good husband! The room looks great!!!!
We like you, we really like you! I have put up a lot of beadboard wainscote in our house and board and batt in a friend’s bedroom. Makes such a HUGE difference, huh? You guys did a super job of it!
See…men think we need flowers and chocolates, and yet the real way to our hearts is putting up some molding in the dining room! :)What a good hubby you have!
Thanks so much for the great tutorial. Your dining room looks amazing.
~ AnNicole
I’ve got to stop playing in Melissa’s parties. Every time i do, i wind up someplace like this, thinking “oooo…aaaahhhhh..this is awesome..i can do this.” and then i want to give up an hour in.
Good for the husband (and the pug watchman for staying on top of the slave labor)
OMG! I am IN LOVE with your wainscotting! It looks gorgeous!!!! Love, love, love your room!
nice work friend! when can i bring dinner over?
I nominate Ryan for HUSBAND OF THE YEAR. He did an awesome job. And I really prefer board and batten wainscoting to actually have the board 🙂 if possible, so I am super impressed that you took the extra step. It made the project extra cool! Nothing like the solid feeling of something REAL like that to make your house feel like a million bucks! Love it!
That looks really fantastic! I’m in the process of doing the same thing in the family room and breakfast area of my little tiny condo. It’s all installed (with one minor mishap–I put a nail through a water pipe and water filled my living room or two hours while I feverishly swept it out the front door and waited for the plumber to show up). I just have to paint it now. Such a process!!
Wowza! That is beautiful work! I am going to print this out and put it on the breakfast table…everyday.
~Nancy
Wowza! That is beautiful work! I am going to print this out and put it on the breakfast table…everyday.
~Nancy
Wowza! That is beautiful work! I am going to print this out and put it on the breakfast table…everyday.
~Nancy
WOW, WOW, WOW! What a transformation. Thanks for the great tutorial too. I’m planning to do this in the downstairs bath, so it was great to have such great info.
Wow it looks great , now I know how to advise others who send me questions about the texture wall issue , you guys did a great flawless job ,
Chris
Just Beachy
Great job Kim and Ryan!! Great teamwork! I love your dining room and the wainscoting is a lovely addition. The room looks very inviting, a wonderful spot to entertain family and friends.
holy magazine house, batman! it looks amazing!!!
Love the board and batten look wainscoting- what a great look it gives that room!! Beautiful room!
It’s beautiful. What does your hubby think of it? How many more rooms are you now hoping to do?
Wow – it looks AWESOME! I love it! What a great transformation!
XOOX
Jen
Oh wow, this is fantastic! I didn’t realize how it was done, so thank you (and the hubby) for posting the step by step photos! Looks great!
Absolutely amazing!! I did one wall in my bedroom for the PP, and thought that was bad enough, I was exhausted. You guys did amazing. It’s really really nice!
It looks so great, congrats on the new overlook of your dining room!
looks amazing. seems like a lot of work, but he did an amazing job.
Your husband is super talented and incredibly patient! You are a lucky, lucky girl. 🙂
You guys did a great job! Looks awesome 🙂
LOVE it! I so want to do this in our home! Thanks for sharing!
That is gorgeous! I’m bookmarking this so I can copy it!
I turned out so nice. Your dining room is amazing!
Love it!
Will Ryan come install some in my house?
Seriously though, I adore this! I’ve wanted to do wainscoting in our office/eventual nursery, and this just reaffirms this is the way to go.
You both did a fabulous job. I want to do this at my house, but we have textured walls too. Now if only I can convince hubby.
Oh my, you are so lucky that your baseboards were thick enough to handle the plywood and vertical boards. Our baseboards were skinnier at the top, so when we did our wainscoting in the dining room we had to just skim coat the walls instead of use plywood for that smooth finish. Congrats on the amazing job!!!
A…MA…ZING! Absolutely gorgeous! One of the best board and batten projects I’ve seen!
This came out beautifully and I totally understand about the unlevel bit!! Our home is about 60 some odd years old and it is totally unlevel!! We have the same trouble and if we have to hang a door –it would be a major construction thingy. If I have to hang a picture and it is very wide we can’t get it straight–either it looks crooked when comparing it to the ceiling or to the floor. We have trouble with our furniture slanting too much and our poor grandson who is one sometimes looks like a drunken sailor when he tries to negotiate some of the floors!! I posted my procrationation thingy on my normal nannykim blog which you will go to if you click the comment. If you want to see my home you can go to my spinde cottage blog which is at http://spindlecottage.blogspot.com
::checking pants:: Yep. I’m pretty sure I just soiled myself the minute I saw the board & battan. It’s so beautiful, I’ve lost control of all bodily function.
GORGEOUS GORGEOUS GORGEOUS!! So crisp and stunning. You done fabulous, girl (& Ryan).
Thank you for the breakdown w/ pics! It dares me to think we can actually tackle this project ourselves.
It looks beautiful! Great job!
OH! MY! STARS!
love it, love it, LOVE IT!
Did I miss something or did you turn into a sneaky girl? I mean, you just can’t drop this type of bomb on us! My heart can’t take it.
Seriously though, it is beautiful and I am just so happy for you. It looks amazing, hug your hubby real tight for me tonight to thank him (oh, then send him on over to my house to get started on my walls!)
It looks amazing! Like you said, it really brightens the space up.
1. It looks awesome- really brightens up the room and, like you said, gives it character
2. I don’t own a home yet, but when I do I think I want this!!
3. I wish my hubby was that handy- How’d Ryan learn to do all this stuff?
it looks GREAT!! It really brightened up the room and I love how it makes the white in your pretty rug POP.
all the cutting around the windows and such! OY! ya’ll are far more ambitious than I! kudos to Ryan for scoring some major wife points 🙂
Kim, that looks awesome! I love how it turned out.
The room looks great! I am impressed with Ryan’s handy work.
How super fabulous! It really transforms your dining room!
Of course as I type this, I’m thinking what room to put this in… hmmm…
GASP!!!! That. Is. Amazing.
Way to go Ryan with the crazy corner cutting!!
It looks fantastic! And really, I can’t believe it was that easy and makes such a dramatic difference!
Wow, these pics, are amazing and you are so lucky to have a handy husband. You guys did a great job and I really liked the links to the other board and batten examples. Thanks for all the info.
I love your board and batten. It’s my favorite kind of trim right now – and Ryan did a fabulous job. Good work you two!
We put up wainscoting first thing in our dining room – I love it and it gives so much character. Now I want to put it up in my office and my husband just rolls his eyes (but secretly he loves it, I just know). Yours is fantastic!
I would have never thought of this either…where did the idea come from? Anyways…its looks amazing! YOu are so dang creative
You have one handy hubby. My lover often does things that he’s not crazy about just for me as well. Don’t we just have the best husbands? 🙂 Your dining room looks great. Love the fresh clean look of white!
Wow! It looks fantastic! I am dying to do this to my dining room. The previous owners in my house just nailed up a random piece of wood right under the window sils. Looks a little odd! I was trying to figure out how I wanted it to look. Thanks for the inspiration!
I don’t think I ever would have thought of adding wainscoting, but it looks great!